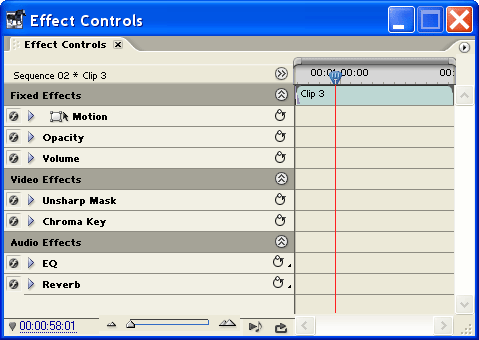
Adobe Premiere Effect Controls Window
By default, the Effect Controls window is found next to the preview monitor in the monitor window. You can view it by clicking the Effect Controls tab or selecting Window > Effect Controls from the main menu. Like the Effects window, you can create a new window for effect controls by dragging the tab to an empty space in the workspace.

The Effect Controls window shows the effects for the currently selected clip in the timeline. As you select different timeline clips, the Effect Controls window changes to show the applicable range of effects.
Fixed Effects are effects which are applied automatically to every clip. Fixed effects for video clips are Motion and Opacity. The fixed effect for audio is Volume.
Other effects are known as Standard Effects and will appear below the fixed effects when applied to a clip.
Adjusting Effects
Note: Effects can be the same throughout the clip or they can be set to change over time. To learn how to change an effect over time, see Premiere Keyframes.
To make changes to an effect, click the triangular button to expand it. You will see various controls which look something like this example:

- Effect Button: Toggles the effect on and off (without adjusting any of the values).
- Toggle Animation Button: Turns keyframes on and off. Any existing keyframes will be deleted.
- Expand: Expand/collapse controls for this effect.
- Effect Name: The name of this effect.
- Reset Effect Button: Resets the effect to it's default value at the Current Time Indicator (CTI). If the effect has keyframes and the CTI is not on a keyframe, a new keyframe will be created.
- Keyframe Navigation: The arrows jump between keyframes. The middle button creates (or removes) keyframes at the CTI.
- Effect Value: The value(s) of the effect. Some effects will have multiple values. Adjust the values by dragging the slider, dragging the numerical value, or entering a numerical value.