Changing Opacity Over Time
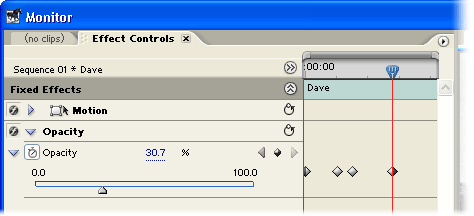
Once you know how the basic opacity settings work, you can get more complicated and vary the opacity as the video clip progresses. To do this you must add keyframes to the clip. The opacity is set separately for each keyframe and the opacity gradually changes from one keyframe to the next. This is called opacity animation.
Here is the procedure for creating opacity keyframes (illustrated with an example below):
- Select the clip in the Timeline window.
- Select the Effects Controls tab in the Monitor window.
- Click the triangle next to the Opacity property to expand it.
- If the Toggle Animation button is not active, click it so it looks like this:

- Move the current-time indicator to the start of the clip and create a keyframe (click the diamond-shaped Add/Remove Keyframe button).
- Set the opacity to the level you want to the clip to start at.
- Move the current-time indicator to the point where you want to make the next opacity setting. Create another keyframe and set the opacity.
- Keep repeating this process until you have created all the necessary keyframes and settings.

In this example we have created four keyframes. You can see that the keyframes are shown in both the Effects Controls window (above) and the Timeline window (below).

- The first keyframe is set to 0% opacity, so the clip is invisible to begin with.
- The second and third keyframes are set to 100% opacity, so the clip fades in and remains completely visible for a short time.
- The fourth keyframe is set to 30% opacity, so the clip fades to that point and remains there for the rest of the duration.