AutoCompose Score: Customise
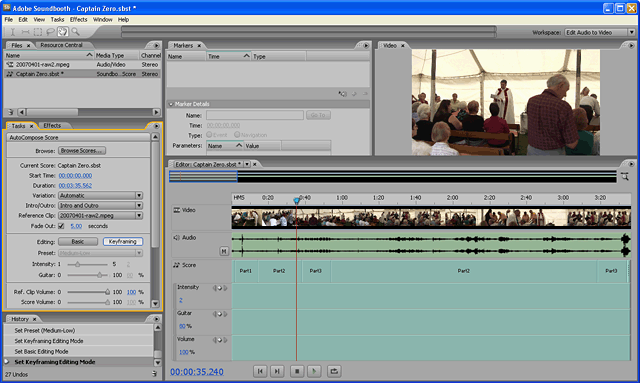
 In most cases you will want to customise the score to better suit the video. The various customisation options are pictured right.
Note: When working on the score it may be helpful to mute the sound from the video clip. Click the M button in the audio track.
There are two types of customisation: Basic and Keyframing. By default Soundbooth uses the basic mode, so let's look at that first.
The Preset menu lets you choose an automatic setting for the "intensity" of the score as well as the levels of various instruments.
Note that intensity is not the same as volume. The intensity level determines the feel of the music:
- Less intensity gives a more mellow, relaxed feel.
- Higher intensity gives a more energetic feel.
You can also tweak the intensity with the slider below the preset menu. In addition, you will notice one or more instrument sliders (e.g. Guitar, Piano, Vocal) which give you control over the melody level.
Adjust the overall volume of the score, as well as the original video, with the two volume sliders.
Keyframing
To gain accurate control of musical changes over time, use keyframing. Keyframing works in much the same way as it does in Premiere Pro, i.e. it lets you specify frames throughout the video where you want changes to occur.
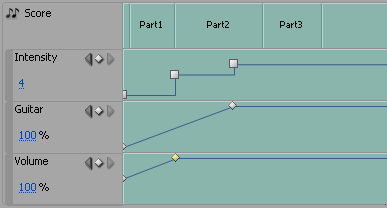
Click the Keyframing button. The preset options are grayed out and the timeline changes as pictured below. In this example there are three new tracks in the timeline: Intensity, Guitar and Volume. The exact tracks will vary depending on the score.

Click anywhere in any of the tracks to set a new keyframe. Move keyframes up or down to increase or decrease the setting. The example below shows three keyframes on the intensity track, two on the guitar track and two on the volume track. The settings on all three tracks increase over time.

Notice how the guitar and volume keyframes are joined by smooth lines whereas the intensity keyframes are joined by angled lines. Angled lines mean the setting stays the same right up until the next keyframe occurs. Smooth lines mean the setting changes gradually between one keyframe and the next. You can change this option by right-clicking any keyframe and choosing Linear or Hold.
More notes on keyframing:
- Move keyframes left, right, up and down by dragging them.
- Navigate between keyframes with the left/right arrows to the left of the track.
- Manually adjust keyframe settings by selecting them and editing or dragging the value shown in blue.
- Delete keyframes by selecting them and pressing the Delete key.
- The button between the two arrows adds a new keyframe. If a keyframe is already selected it will be deleted.
Next page: Exporting the score