Windows Movie Maker: Movie Tasks

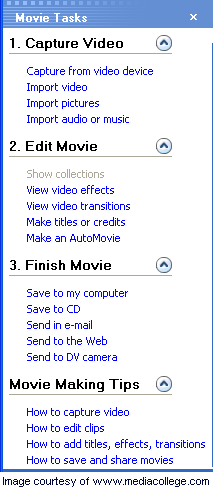
The Movie Tasks pane (pictured right) appears by default in the left part of the user interface. If you can't see it, click the Tasks button in the toolbar.
The Movie Tasks pane is designed to step you through the process of creating a movie, from importing video clips to exporting the final product for viewing. You probably won't need to complete all the steps — just start at the top and work down, missing out the steps that don't apply to you.
Here's what they all do...
1. Capture Video
- Capture from video device
- Import video
- Import pictures
- Imports audio or music
This section lets you bring source clips (video, audio, etc) into your project. The first option lets you connect to a compatible video camera and record the footage to your hard drive. The next three options all open browse windows and let you choose files that are already on your hard drive.
Note: All the import options actually do exactly the same thing except the browse window will only show the relevant file types by default. You can choose to see all files by selecting All Files (*.*) in the window's Files of Type drop-menu. This way you can import any files using any of these options, i.e. you can import video, pictures and audio clips all at once.
2. Edit Movie
- Show collections
- View video effects
- View video transitions
- Make titles or credits
- Make an AutoMovie
The first three options in this section determine what is displayed in the Contents pane. You may want to move backwards and forwards though these displays a few times, choosing and adding things to the timeline.
The fourth option opens the title wizard which helps you create titles for the movie.
The last option opens the AutoMovie wizard which does all the hard work and puts together a movie timeline for you. This works fine in some cases but if you want any sort of control you'll need to skip this step and edit the timeline manually.
3. Finish Movie
- Save to my computer
- Save to CD
- Send in e-mail
- Send to the Web
- Send to DV camera
This section provides various options for creating and delivering the final movie. This is where you can specify settings for the exported movie and save it, burn to CD, email it or publish it on the web. There is also an option to send the movie back to your DV camera, which can be a handy way to connect and view it on a television.
There is no option in version 2 to burn to DVD — you will need some other software to do this.
Movie Making Tips
- How to capture video
- How to edit clips
- How to add titles, effects, transitions
- How to save and share movies
Self-explanatory, this section provides various help files.