Shooting Time-Lapse Video
There are two ways to create time-lapse (fast motion) video:
- Record the video at normal speed and then speed it up using editing software.
- Record the video using the camera's built-in timelapse function (if the camera has this capability).
Whichever method you use, you'll want to follow a few general rules:
- Mounting the camera: For most time-lapse recording you'll want to set up a tripod and leave the shot recording. If you don't have a tripod, you can use a sandbag or something similar. Just make sure it won't fall over if the wind picks up.
- Focus: Decide whether to use automatic or manual focus. If the camera is unattended (as it usually is in timelapse shots), you may need to use auto-focus if the subject is likely to move closer to or further away from the camera. If the subject is going to stay a fairly consistent distance away (especially if it's more than about five metres) then you should be able to set the focus manually on a certain point and leave it there. Where possible, manual focus is safer as you'll avoid any "focus swimming" if something happens to upset the auto-function.
- Exposure: Manual iris is generally preferable but if the camera is unattended, auto-iris may be necessary. Be aware that this might affect the final video, for example, if the iris is opening and closing in a way that looks fine at normal speed, it might look very obvious at high speed.
- Record Duration: With modern cameras you should have plenty of record time available on your disk (or whatever media you record on). However it's important to be sure about this beforehand. Clean out your disk to maximize record time. If necessary, you might be able to reduce the video quality which takes up less space.
Next, decide which of the following two methods you'll use to record the video:
(1) Record at Normal Speed

Advantages: More flexible (you can vary the speed as you edit it), better quality (editing software can do some nice tricks such as blend frames together for a smoother movement effect).
Disadvantages: Requires reasonably good editing software, takes more effort.
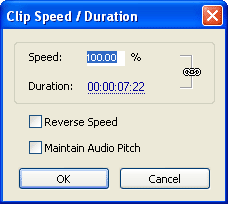
To use this method, record the video normally then import it into your video editing software to speed it up. Exactly how you speed it up will depend on your software, so search your help files for "speed / duration". We use Adobe Premiere Pro which as various ways to change speed (more info here). The simplest example is this:
- Add the clip to the timeline.
- Right-click the clip and select Speed/Duration... from the context menu.
- Enter a speed greater than 100% to speed the video up.
(2) Built-in timelapse functions
Advantages: Easy to do, requires no editing software or skills, takes up less space on your recording media. Instantly available after recording.
Disadvantages: Much less flexible—once the video is recorded you're pretty much stuck with what you've got. Although it is possible to edit it later, you'll be quite restricted in what's possible. Most cameras have no possibility of advanced effects such as frame-blending.
More info
- Example of a timelapse video with an explanation of how I did it.
- Time compression in videos
- Timelapse in Adobe Premiere Pro