Using the Default Transitions in Adobe Premiere
Premiere has default video and audio transitions which can be added to clips in various ways. This can be much more efficient if you use the same transitions a lot.
By default, these transitions are Cross-Dissolve for video and Constant Power (crossfade) for audio.
To Apply the Default Transition
- Make sure the correct track is targeted (click the header at the start of the track).
- Position the Current Time Indicator at the join between the two clips. To make this easier, you can use the Next Edit and Previous Edit buttons in the Program Monitor view.
- Choose Sequence > Apply Video Transition or Sequence > Apply Audio Transition.
- Keyboard shortcuts are CTRL-D (video) and CTRL-SHIFT-D (audio). You can change these shortcuts by selecting Edit > Keyboard Customization.
To Change the Default Transition
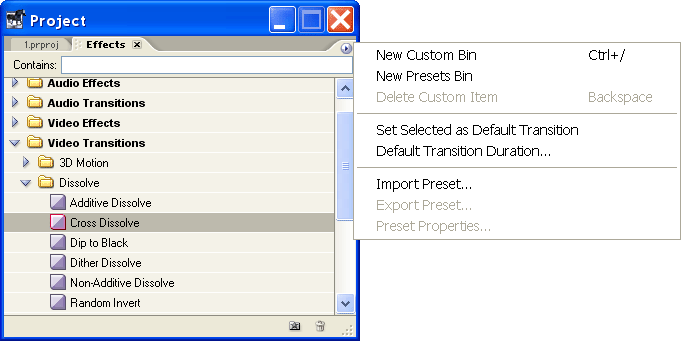
Open the Effects window (Window > Effects). Expand the Video Transitions or Audio Transitions bin. You will notice that the default transition is indicated by a red border.
Select the desired transition. Click the options button (top right of the Effects window) and choose Set Default Transition.

From this menu you can also select Default Transition Duration to change the length of the default transition.
That's the end of this transition tutorial. For more information, see our Adobe Premiere Tutorials or join our Video Discussion Forum.