How to Set up a Tape-to-Tape Editing System

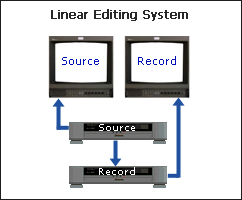
The diagram on the right shows a simple linear (tape to tape) editing system. It consists of two VCRs, two video monitors (or televisions) and connecting leads. The basic process is to play the original tape in the source machine and record a new (edited) version on the record machine.
Begin by choosing which of your VCRs will be your source and which will be the record. In most cases it won't matter which is used for each purpose, but if one machine is strong in one area it might make a difference. For example, if one machine has better recording features it will be the obvious choice for the record machine. If you don't know which to use, assign them at random.
Connect the VCRs

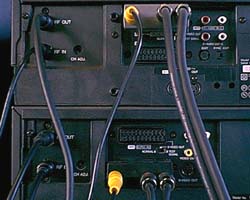
To connect the two VCRs together, plug the video and audio outputs of the source machine into the video and audio inputs of the record machine.
There are a number of common analogue connection types, the most common being RCA, RF (AKA aerial or Belling-Lee), S-Video and SCART. S-Video is probably the best choice for video and RCA for audio. RF is the lowest quality and has other complications — avoid it if you can.
Digital video machines may also have connectors such as Firewire or USB, which are the best quality of all.
Connect the Monitors
Once the tape machines are connected, connect each machine to its own monitor. Exactly how you do this will depend on your VCRs.
- The record machine should have AV outputs available — plug these into the record monitor. If the only output is RF (aerial), connect this to the monitor instead (just like a TV).
- If the source machine has spare AV outputs, connect these to the source monitor. Again, if necessary, use the RF output instead.
Finally, select the correct inputs on the record machine and both monitors. For example, if you have connected the source machine's AV outputs to the record machine's AV inputs, you will need to select "AV" from the record machine's input selector. If you are using RF, you will need to tune the record machine and/or monitors.
Notes:
- Although you can edit with one monitor, it is significantly easier with two. If you don't have a second video monitor, we strongly recommend that you buy a small, cheap TV. If you absolutely must stick to one monitor, it will be connected as the record monitor.
- In order to keep things simple we have assumed the monitors are also playing back audio (like a TV). If possible, route the audio from the record machine to a good stereo or audio monitor.
- For more detailed instructions see Connecting Two VCRs.
Testing
Once everything is connected, test the system.
- Play a tape in the record machine and make sure it appears on the record monitor. Also check the audio.
- Stop the record tape and play a tape in the source machine. It should appear on both the source and record monitors (because it is being fed through the record machine). Check the audio.
If something isn't working, chances are you have either made the wrong connections or selected the wrong input(s). There are only a limited number of combinations — if all else fails employ trial and error.
If your testing is successful, you are ready to begin editing.
Next Page: Edit Controllers